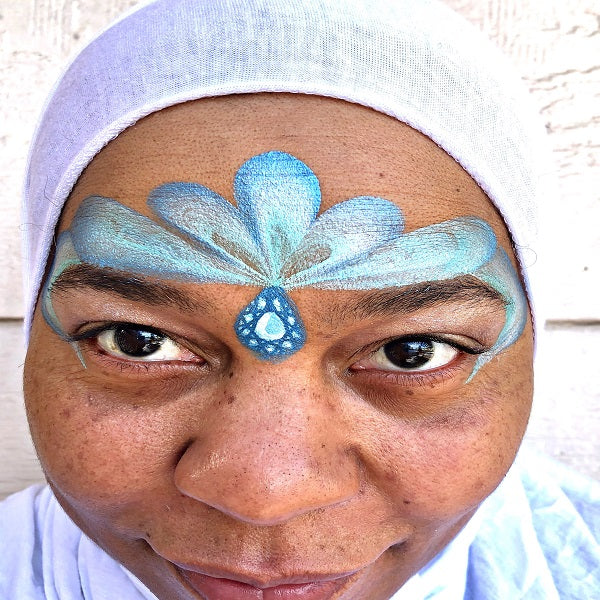
Winter season is full of cheer. Watching the snow fall and create such beautiful scenery and landscapes is captivating. I just love winter time. I think of so many designs from cozy warm and cuddly, to its so cold outside BRR designs with snow falling, snowflakes and icicles everywhere.
This cute winter princess design is so fun and so easy to do. Quick for on the job when you have to be fast. I've made it so it doesn't have to be painted by the eye, you can just add a little shadow or shimmer to seal the deal.
I use to avoid anything Princess, Mask or Crown related. They were my nemesis but after doing them over and over again, I just learned to be myself and add my own spin to the things I would see online. You have to do what you can to make it easier for you so you won't be so stressed. Painting with one strokes also helps things to move a lot quicker on the job. I hope this tutorial will be helpful for you as well!
Supplies:
TAG 1 Stroke Frozen Winter (sub Silly Farm Arty Brush Cake-Midnight)
Mikim Fx Face Paint Pearl White (sub Mikim Metallic Silver)
Diva Stencil Forehead Gem Band (sub BAM PAX Stencils-Bejeweled)
QBoutique Gem Cluster (sub Forest Fairy Bling)
Silly Farm Paint Pal Swirl Brush #3 Round
Art Factory Studio Brush #4 Round
American Painter Angle Brush 3/4"
Always Wicked Butterfly Sponge

Step 1: One Stroke Flow
I start at the center of the forehead with my 1 stroke and make a teardrop with a 3/4 angle brush. Make another 2 teardrops one on each side of the main teardrop this time making slightly smaller. Elongate the next two teardrops to stretch out toward the end of my eyebrow and then make a loop stroke that wraps around the eye. You are building the base and the shape for your crown here.

Step 2: The Gem
I take the Diva Forehead Gem Band Stencil or BAM Pax Bejeweled Stencil and choose the best shape to place at the center of my forehead to hang from the crown. I use Always Wicked Teardrop Sponge and pick up the darker color blue in my 1 stroke paint and tap tap to get the shape of the jewel down. I then sponge a strong white paint with the stencil to get the details of the jewel in place to make it look more crystal like. Add a few highlights with strong white paint on the gem in certain areas for extra accents using a #2 or #3 brush.

Step 3: Line Work
I start with the center using Wolf Blue or any Royal Blue Color and make 3 teardrops at the center with a #4 round brush. Make sure the teardrops are different sizes from longer to shorter and also using the thick to thin and thin to thick technique. Work in odd numbers with your teardrops as well it just makes them look better. I add 2 swirl strokes on each side of the teardrops and then add 2 more longer teardrops to close up the crown with a short loop stroke. I finish the line work with 5 teardrops that flow around my eye for a more fancier look.

Step 4: More Line Work and Accents
To make the design even more decorative and to make it pop, I take my #4 round brush and my strong white and add to the open ares and over some of the blue that I used prior. I make 3 smaller teardrops strokes between the space at the top of the crown. I also add 5 more smaller teardrop strokes on top of the blue to accent it more. To finish it off with tiny details I add dots using my #2 or #3 round brush to the areas I'd like to add more pizzazz too. You can pick and choose how creative or how simple you want to go from here.

Step 5: Finishing Touches
For the last and optional step, I add QBoutique beautiful gem cluster right in the center of my piece which is optional but it adds such a cute and cozy touch! Then I add my favorite step of all Glitter. Who doesn't like adding glitter right? I know I love it! I used Festival Glitter Frost and it sure is a beauty. You add a little right above your cheek bones so you wont overdue the design. Just a subtle touch goes along way and gives the wow factor on the job. This design is super quick and you can play around with it adding more techniques or making it more elaborate or just keep it simple.
Hope you enjoyed this tutorial - Cant wait to see your version!
Tamina Muhammad is an award artist and professional face painter. She is the owner of Tamina Fun faces and has been face painting for 8 years. She teaches the youth in the inner cities and also teaches Seniors drawing and painting. She was an instructor at FPBA Convention in St Louis 2018. She has a background in Illustration Art and Design.
Tamina loves giving you something bold, fun ,unique and cool. She has a illustrative urban street art style that is sure to bring a smile.
She has won numerous face painting competitions and has been published in various face and body art magazines.
You can see more of her work on her Instagram and Facebook pages.


